How to Change Video Quality on NetMirror App (Updated 2025)
As streaming continues to expand in 2025, users expect more control over how they watch movies, shows, and live programs online. NetMirror has become a preferred choice for many because of its huge variety of content and easy-to-use interface. One of the most important features for any streaming platform is flexible video quality settings. Many users want to Change Video Quality on NetMirror App to match their internet speed, reduce data usage, or improve the clarity of what they’re watching.
Whether you use NetMirror on your phone or computer, understanding how to manage these settings makes a noticeable difference in playback performance. This guide explains what video quality options the app supports, how to adjust them on different devices, and what to do if HD options are not showing up.
Why Video Quality Adjustments Matter on NetMirror
Streaming quality is central to a smooth viewing experience. A high-resolution stream gives you a sharper picture, but it also requires more data and a stronger connection. On the other hand, lowering the resolution helps prevent buffering on slower networks.
Most users choose to Change Video Quality on NetMirror App for the following reasons:
- Unstable Wi-Fi or weak mobile data: Lowering the quality helps prevent frequent interruptions.
- Limited data plans: Choosing a lower resolution reduces overall data consumption.
- High-speed internet: Increasing the resolution allows you to enjoy crisp visuals.
- Auto quality not performing well: Manual quality selection offers better consistency.
Being able to adjust quality manually lets you match the stream with your network conditions instead of relying on automatic adjustments.
Does NetMirror App Support 1080p Video Quality?
NetMirror can support 1080p (Full HD) video playback, but this depends on several factors. Not all content and servers offer the same resolution options, so users may see different choices from one video to another.
1. Server-Based Quality Differences
For every video, NetMirror typically provides multiple servers. The available resolutions depend on what the uploader or source provides. While some servers support 1080p, others may only offer:
- 480p
- 720p
- 1080p
If a server does not include HD versions, 1080p will not appear in your quality settings. Switching servers usually solves this issue.
2. Internet Speed Requirements
To stream 1080p smoothly, users generally need:
- 10 Mbps for basic Full HD playback
- 15 Mbps or more for stable performance without buffering
If your connection drops below these speeds, the app may limit the available resolutions.
3. Content Quality Limitations
Some older uploads or low-resolution videos simply do not exist in HD. Even if your device and internet speed support high-quality streaming, the maximum resolution may still be low due to the source file.
4. Device Performance
Older mobile devices and low-end PCs can struggle with high-resolution playback. In such cases, the app may automatically reduce the quality to keep the video running smoothly.
Understanding these factors helps manage expectations before trying to Change Video Quality on NetMirror App for the best playback results.
How to Change Video Quality on NetMirror App on Mobile (Android/iOS)
Adjusting video quality on a mobile device is simple, and the process works similarly across Android and iOS. Mobile users often make these adjustments when streaming on mobile data or when watching content on the go.
Step-by-Step Guide for Changing Quality
1. Open the NetMirror App
Launch the app and navigate to the video you want to watch.
2. Start Playback
Tap on the video and let it begin playing for a moment.
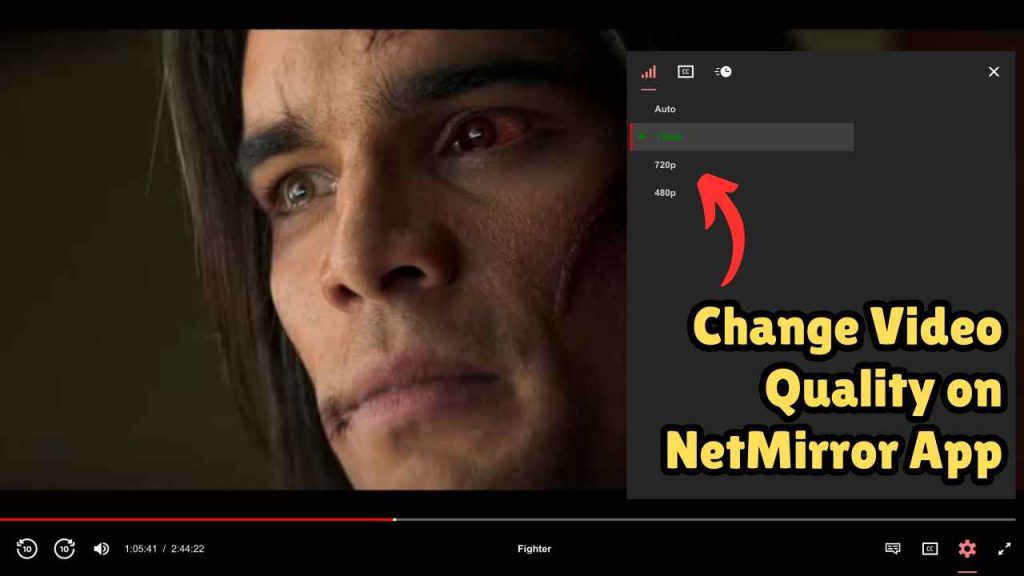
3. Access the Playback Settings
Look for the gear icon (⚙️) or a quality indicator like SD/HD on the video player.
4. Select “Quality” or “Resolution”
A list of options will appear, such as:
- 240p
- 360p
- 480p
- 720p
- 1080p (when supported)
5. Choose the Quality You Prefer
Tap the resolution you want. The app will switch instantly.
6. Switch Servers if Needed
If only low-quality options appear:
- Try Server 1, Server 2, Backup, or Mirror
- Then check the quality menu again
Different servers often have different resolution options.
Tips for Better Quality on Mobile
While learning how to Change Video Quality on NetMirror App on your phone, the following practices help ensure smoother streaming:
- Use a stable Wi-Fi connection whenever possible.
- Close unused apps to free up memory and improve performance.
- Clear the app cache occasionally to avoid loading issues.
- Keep the app updated, as new versions include better servers and improved optimization.
By applying these tips, mobile users can enjoy more reliable streaming and better picture clarity.
How to Change Video Quality on NetMirror on PC/Laptop
NetMirror can also be used on desktops and laptops through a browser or a Windows app. The process for changing quality on a computer is slightly different from mobile but just as easy.
Changing Video Quality on Browser (PC/Windows/Mac)
1. Open NetMirror in Your Browser
Use modern browsers like Chrome, Edge, or Firefox for better compatibility.
2. Play the Video
Click to start your movie, drama, or live stream.
3. Hover Over the Video Player
Move your mouse over the player to reveal the playback toolbar.
4. Open the Quality Menu
This may appear as:
- A gear icon
- A button labeled “Quality”
- A drop-down menu showing HD/SD
5. Select the Resolution You Prefer
Available options could include:
- 360p
- 480p
- 720p
- 1080p
If HD options are missing, switching servers usually restores them.
Changing Quality on the NetMirror Desktop App
Some users install the Windows version of NetMirror for smoother playback. The steps are straightforward:
1. Launch the NetMirror Desktop App
Open the application from your PC.
2. Start Playing a Video
3. Open the Settings Menu
Click the gear icon or quality button.
4. Choose Your Resolution
Select the quality level you want from the available options.
Optimization Tips for PC Streaming
To get the best experience when adjusting settings:
- Use an Ethernet cable for the most stable connection.
- Close unnecessary browser tabs and background programs.
- Enable hardware acceleration in browser settings.
- Keep your browser and app updated for better performance.
These steps help ensure your attempts to Change Video Quality on NetMirror App lead to the best possible results on your PC or laptop.
Why HD Options Sometimes Don’t Appear on NetMirror
If you open the quality menu and only see low-resolution options, several factors may be responsible:
1. Slow or Unstable Internet
If your network speed drops, NetMirror may hide HD options to avoid buffering.
2. Server Limitations
Some servers do not offer HD, regardless of your connection.
3. Peak Usage Times
During busy hours, certain servers may struggle to load HD streams consistently.
4. Outdated App Version
Older versions may not support the newest high-quality servers.
5. Device or Browser Limitations
Older hardware or outdated browsers may not support certain playback resolutions.
Understanding these causes helps troubleshoot quickly so you can return to watching in the quality you prefer.
Final Thoughts
Streaming becomes much more enjoyable when you have control over the video quality. Whether you lower the resolution to save data or switch to HD for a sharper picture, the ability to Change Video Quality on NetMirror App ensures a more personalized experience. With the steps and tips provided here, you can adjust quality on both mobile and desktop devices with ease. Most issues can be resolved by checking your internet speed, switching servers, updating the app, or optimizing your device settings.